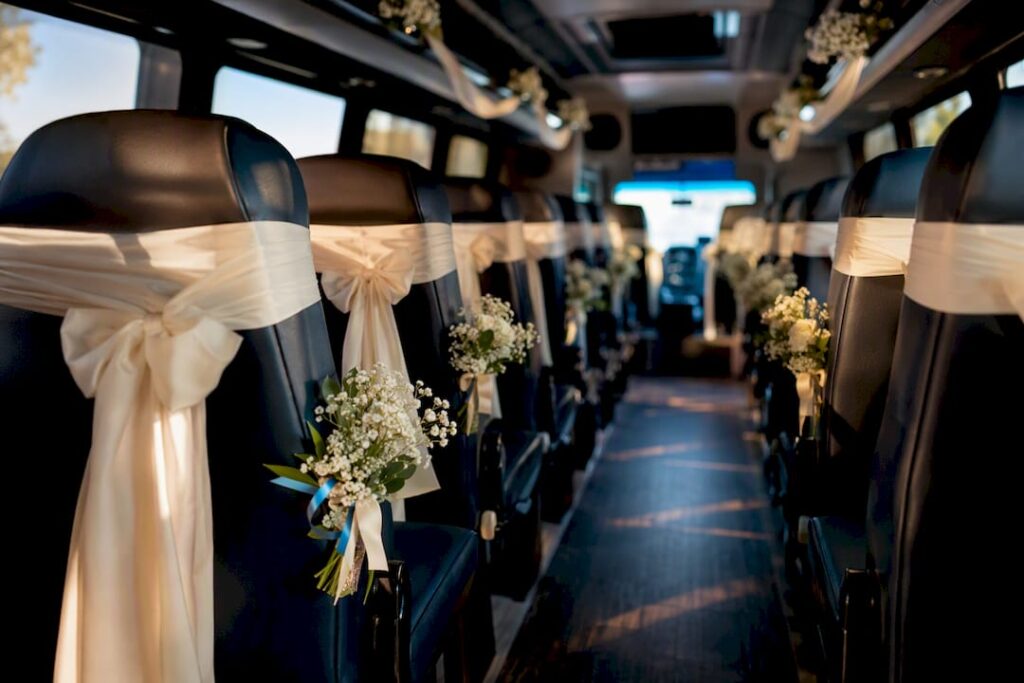
Yes, you can decorate a wedding shuttle, and the best results come from removable, operator-approved accents that match your palette. Stick to battery-powered lighting instead of candles, skip anything that isn’t secured, and always confirm your plan with the operator before you touch a single ribbon. Get that approval in writing, and the rest is just styling — for ideas, consider consulting the DJ who knows every guest · Musify for music and entertainment options to enhance the shuttle experience.
TL;DR:
- Interior decorations should be secured with ribbon, Velcro, or zip ties, avoiding adhesives, suction hooks, or items on glass to prevent damage or safety risks.
- Exterior decor options are limited to magnetic signs, weatherproof placards, or signs held by staff, as wind and weather can damage and dislodge loose decorations at highway speeds.
- Always confirm decoration materials, installation and removal times, and responsibilities with your operator in writing to avoid last-minute disapproval or damage charges.
- Decorations must not block emergency exits, release handles, or driver sightlines, and safety standards require unobstructed access to emergency equipment during the event.
- Prioritize affordable, lightweight items like ribbon, fairy lights, and printable signs for the best visual impact without risking vehicle safety or incurring high costs.
Table of Contents
- Decorate a Wedding Shuttle: Interior Ideas That Look Great and Stay Safe
- Exterior Decoration: When It’s Worth It and What to Avoid
- Operator Rules and Safety Checklist Before You Decorate
- Pack-and-Go DIY Decoration Kit for Your Wedding Shuttle
- Wedding Shuttle Decoration Themes You Can Copy
- Day-Of Install and Removal: A Timed Walkthrough
- Budget and Materials: Where to Save and What to Splurge On
- A Provider’s Practical Perspective on Wedding Shuttle Décor
- Book a Decorated Wedding Shuttle Through Reliant Transportation
- Sources
- FAQ
Decorate a Wedding Shuttle: Interior Ideas That Look Great and Stay Safe
The inside of the shuttle is where you get the most visual payoff for the least risk, and it’s where guests actually spend their time. Seat sashes tied to headrests, mini bouquets zip-tied to handrails, and ribbon garlands looped along luggage racks all read as intentional without touching anything structural.
Battery-operated fairy lights and LED candles do the heavy lifting here. String lights around window frames or drape them along the ceiling trim using clips rather than tape, and skip anything with an open flame entirely, since that’s a hard no on any charter vehicle. LED votives tucked into secured centerpieces on a shelf or dash area give you candlelight ambiance with zero fire risk.
For finishing touches, small favor bags looped over seatbacks or a low-profile “Just Married” sign propped against the front window make a great photo moment as guests board. A few attachment rules keep everything on the safe side of the line:
- Use ribbon, twine, or Velcro fasteners on handrails and seat frames, never on windows.
- Skip adhesive strips and suction hooks on glass. They tend to fail on bumps and leave residue.
- Keep every hanging item above shoulder height and clear of the center aisle.
- Never decorate over emergency exit markings, release handles, or window latches.
Done right, this kind of styling turns a standard shuttle bus wedding theme into something guests actually photograph.
Exterior Decoration: When It’s Worth It and What to Avoid
Exterior decor is where most shuttle bus wedding decorations go wrong. Wind at highway speed can rip off a banner, crack a magnetic sign against the paint, or send loose ribbon flying into someone’s windshield. Weather adds another layer of risk. Rain-soaked paper signs turn to pulp, and anything taped on tends to leave adhesive marks the operator will bill you for.
Safer exterior options exist if you want a little flair on the outside:
- Removable magnetic signs designed for vehicle exteriors, not paper or tape-based ones.
- Small weatherproof placards zip-tied to a rear rack or hitch point, never to the body panels.
- A pickup-point sign held by a coordinator or propped near the boarding door, not attached to the vehicle at all.
If your venue involves any highway driving or the forecast looks rough, put your energy into the interior instead. It’s the space guests actually see up close, and it’s the one part of the vehicle the operator will almost always let you personalize freely.
Operator Rules and Safety Checklist Before You Decorate
Every legitimate charter company has policies about what can and can’t go on their vehicles, and finding out on the wedding day is the wrong time to learn them. Work through this list before you buy a single decoration:
- Ask the operator exactly what materials are permitted, including whether adhesives, tape, or exterior attachments are allowed at all.
- Confirm the installation and removal window in writing. Many companies allow a small crew to board early, but the exact timing varies by contract.
- Find out who is responsible for installing and removing decorations, whether that’s your crew, a coordinator, or the driver.
- Ask about cleanup fees or damage charges tied to decorations, and get that policy spelled out in the transportation contract.
- Walk through the safety non-negotiables with whoever installs: aisles, steps, doors, emergency exits, exit markings, and driver sightlines must stay completely unobstructed.
- Document your decoration plan and get the operator’s written sign-off before the wedding day arrives.
Federal safety standards under 49 CFR §571.217 require unobstructed emergency exits with specific opening dimensions on buses, and no amount of styling is worth overriding that. Putting your special requests in writing protects both you and the operator if there’s ever a disagreement about what was agreed to.
Pack-and-Go DIY Decoration Kit for Your Wedding Shuttle
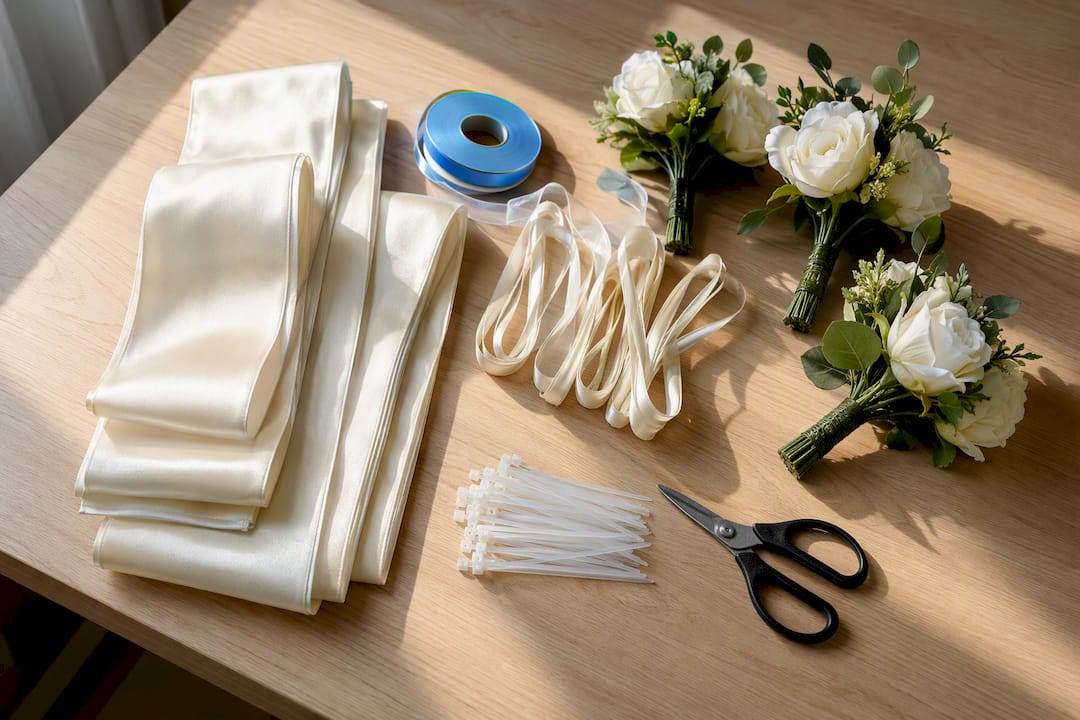
A pre-labeled kit is the single biggest time-saver in this whole process. Build one box or bag with everything pre-cut and ready to go, and installation drops from an hour of fumbling to a few focused minutes.
Your kit checklist should include:
- Pre-cut ribbons and garlands, already measured to length.
- Zip ties or Velcro fasteners approved by the operator (skip anything adhesive-based).
- Battery-operated fairy lights with fresh batteries taped in place.
- Small silk bouquets or florals, pre-wired for quick attachment.
- One weatherproof sign for pickup-point or window use.
- Scissors, a small tool bag, and a dedicated cleanup bag for trash and packaging.
Label each bundle by location (“driver-side handrail,” “rear window,” “seat 3 sash”) and stage them in the order you’ll install them.
Pro Tip: Assign one person to install and one to run supplies back and forth. Practice a one-minute walkthrough beforehand so on the wedding day, someone can do a final spot-check and snap a photo of the finished interior before guests board.
Wedding Shuttle Decoration Themes You Can Copy
Matching your shuttle to your overall wedding aesthetic doesn’t require reinventing anything. These combos work because they lean on materials that are already lightweight, removable, and photograph well.
- Rustic: Twine-wrapped handrails, dried floral bundles at the entry, and kraft paper seat tags with guest names.
- Elegant: Silk swags along the ceiling trim, small pearl strands woven through garlands, and LED votives on window ledges.
- Boho: Macramé accents on seatbacks, pampas grass stems tucked into a doorway arrangement, and warm-white fairy lights strung overhead.
- Party: A balloon cluster framing the entry door, confetti-free favor bags on seats, and a wedding hashtag sign propped near the window.
For each theme, stick to fabric, dried botanicals, or battery lighting rather than fresh-cut flowers that wilt over a multi-hour event. When guests board, frame your photo moment at the entry door. That’s where the light is best and where every guest naturally pauses.
Day-Of Install and Removal: A Timed Walkthrough
Plan for your decorating crew to arrive 45 to 90 minutes before the first guest boards. Meet the driver or operator contact the moment you arrive. That buffer covers any last-minute schedule shifts without eating into guest pickup time.
- Get operator sign-off the moment the vehicle arrives on-site, confirming the vehicle matches your booked type and capacity.
- Install interior décor first, working from back to front so you’re not climbing over finished sections.
- Double-check every loose item is secured, then walk the aisle to confirm nothing blocks exits or driver sightlines.
- Take your photo of the finished interior before guests arrive.
- Do a final walk-through with the driver so they know what’s on board and where.
For removal, reverse the sequence and use your cleanup bag as you go. A five-minute strip-down at drop-off avoids the extra charges some contracts attach to leftover décor.
Budget and Materials: Where to Save and What to Splurge On
Ribbon, battery-operated LED lights, and printable signs deliver the most visual impact for the least money, and you can find all three at a craft store or big-box retailer for well under $50 combined. Fresh florals and custom vehicle wraps cost significantly more and carry more restrictions, so save those splurges for areas the operator explicitly allows.
If you’re tight on budget or time, prioritize three things: a cohesive color palette, battery lighting, and one strong photo moment at the entry door. Everything else is a bonus.
- Low-cost, high-impact: ribbon, garlands, LED fairy lights, printable signage.
- Worth the splurge: small fresh floral accents near the entry, a professionally printed weatherproof sign.
- Where to shop: craft stores for ribbon and florals, big-box suppliers for lighting, online retailers for custom signage.
A Provider’s Practical Perspective on Wedding Shuttle Décor
Reliant Transportation cares about two things above all else on a wedding day: punctuality and a safe passenger experience. Décor is welcome as long as it doesn’t compromise either one. Ask about permitted materials and your installation window early, and we’ll walk through what works for your specific charter bus when you request a quote.
— Dusty
Book a Decorated Wedding Shuttle Through Reliant Transportation
Wedding shuttle providers often serve the Portland metro area, the Willamette Valley wine country, and the Hood River region, coordinating pickup timing to help avoid scheduling headaches with decoration plans.

When you request a quote, just ask about permitted decoration materials and your installation window up front. We’ll confirm what fits your vehicle and your timeline before the wedding day arrives, not after. If you’re still deciding on vehicle size or want a sense of what shuttle service typically runs, our wedding transportation budget guide breaks down typical costs by group size. Ready to lock in your date? Book your charter bus and mention your decoration plans when you reserve.
Sources
Federal bus safety requirements around emergency exits and window retention are spelled out in 49 CFR §571.217. For contract language covering installation windows, cleanup fees, and written special requests, The Knot’s transportation contract guide is a solid reference. Whatever these sources say, your specific operator’s written policy is always the final word on what’s allowed for your vehicle.
- Wedding Transportation Contract: A Lawyer’s Definitive Guide | The Knot
- 49 CFR § 571.217 – Standard No. 217; Bus emergency exits and window retention and release | LII / Cornell
- Complete list of wedding vendors and gratuity guidance | Brides
FAQ
How Much Should I Tip My Wedding Shuttle Driver?
Many transportation companies already include gratuity on the invoice, so check your contract first. If it’s not included, a tip of roughly 15 to 20% of the pre-tax bill, or about $20 to $30 per driver, is a common guideline depending on hours worked.
What Is the Average Cost for Wedding Transportation?
Cost depends heavily on vehicle size, hours booked, and your route, since a mini-bus and a full charter bus carry very different price points. Reliant Transportation’s wedding transportation budget guide breaks down typical price ranges by vehicle type for couples planning in the Portland and Willamette Valley area.
Is It Rude Not to Provide Wedding Transportation?
It’s not rude, but it’s a missed opportunity when guests are traveling from out of town, venues are far apart, or an after-party runs late. The Knot recommends prioritizing transportation for the wedding party and VIPs at minimum, even if full guest coverage isn’t in the budget.
How Do You Decorate a Wedding Shuttle?
Focus on removable, battery-powered interior accents like ribbon garlands, LED fairy lights, and secured floral touches rather than anything requiring adhesive or open flame. Always confirm permitted materials and your installation window with the operator first, and keep aisles, exits, and driver sightlines completely clear.
Can I Put Signs on the Outside of the Shuttle?
Some operators allow removable magnetic signs or small weatherproof placards attached away from body panels, but exterior decor carries more risk from wind and weather. Ask your operator directly, since exterior policies vary widely between companies.